
We really really really (I mean super duper really!) don’t like rainy, gloomy weather! Being stuck inside sure does put a damper on the day sometimes. Mini Thor loves to play outside and this February weather we are having here at the end of April has made for a little man with cabin fever! But have no fear, mommy is here!!! Mommy to the rescue, with craft supplies in hand! You know, I think I need a cape!
For our rainy day project we made sun catchers! Might as well think about the sunny days, right?! If you have kids there’s a good chance you also have a collection of broken crayons. My “little mister particular pants” does not like to use them once they are broken, because well, they are broken. I have a whole bucket of sad, unwanted crayon parts in the art closet that have been just waiting for their time to shine!
To make theses super cool suncatchers you will need..
– Wax Paper
– Crayon Shavings
– Iron & Ironing Board
– Towel
– Scissors
– Yarn or string for hanging
The how to…
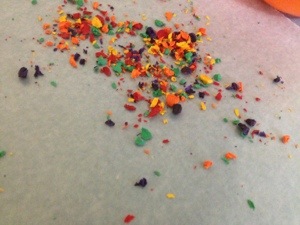
Make shavings from your old crayons

Mini Thor dug through the bucket and picked out which colors we should use and peeled the paper off. Then, I made the shavings using scissors.
Get out your ironing board and place a towel or cloth on top that you don’t mind some wax being melted on (this is a possibility so it’s better safe than sorry).
Put a sheet of wax paper down and the it’s time to add the crayon shavings!

Mini Thor added lots of colorful “sprinkles”
Now it’s time to heat up the iron. I put mine on the heat setting for cotton.
Add another sheet of wax paper on top.
Use the iron to heat the wax paper and crayon shavings! This is cool to watch (as long as your little one understands that the iron and suncatchers are hot and not to touch).
The two pieces of wax paper will melt together sealing the rainbow swirls of magic inside!
(No wax transfer was left on the iron, but if you are worried, you can place a towel over the suncatchers before ironing.)
You will have the coolest window art on the block now!

I cut one suncatchers into a simple circle and the other into a butterfly shape, per Mini Thor’s request haha.

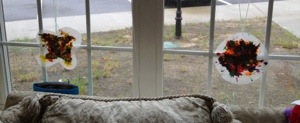
To hang them, just poke a hole in the top somewhere and thread some string through. Ta-da!
I can’t wait to see how awesome they look in the window on a sunny day!

[I didn’t come up with his fabulous idea on my own, I was inspired by a post I saw on Facebook by “The PLAY Group,” a page that is a collaboration of several websites that offer activity ideas for little ones. The post gave a link to the wonderful website Two Daloo. There I found a post about making butterfly suncatchers which inspired the activity you saw here today.]
We will probably be making some more of these in the near future! They would make a cool gift for a grandparent too!
We hope you find some fun even on the rainy days
-Kate


Your suncatchers look great and it sounds like your little one had fun! Wish I had thought of making the shavings with scissors- I used a cheese grater and accidentally grated my knuckles as well 😉 Thanks for the shout-out!